Events are user actions that can be tracked pre- and post-conversion or application install. They are a great way to track steps within a funnel, free trial signups, in-app purchases, returning customers and so much more. Events can be revenue impacting actions or simply used for gaining insight into customer behavior.
This Article Will Help You
- How to Enable Events
- How to Create and Publish Events
- How to Apply Events to Offers
- How to Customize Events Per Campaign
- How to Generate Event Pixels
- View Event Reporting
In order to create Events, this feature first needs to be enabled within CAKE's Global Settings.
To enable, follow these steps:
- Click on the Setup main tab.
- Click on the Tracking Settings sub tab of the Settings left navigation panel.
- Check the box next to Enable Events under General Settings.
- Click Save on the bottom of the Settings grid.
- Refresh your browser page.
Section 2: Create Events and Modify Settings


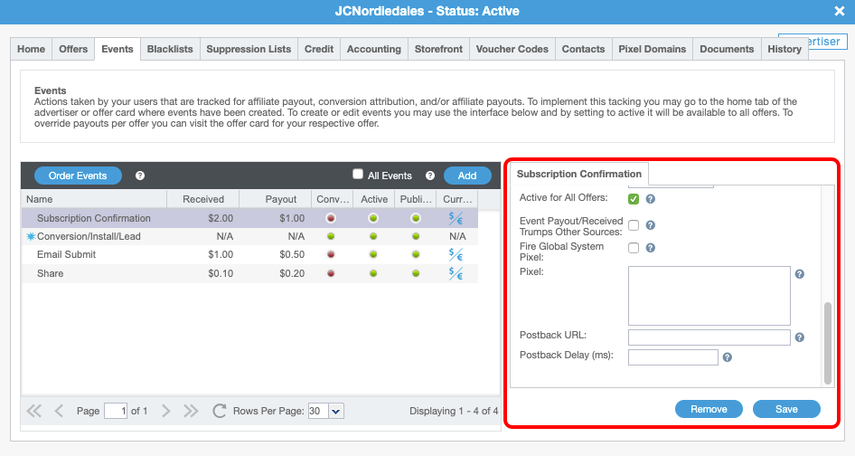
Events are created on the Advertiser level so that they can be easily applied to each of your Advertiser's Offers because most Advertisers will track the same user actions across Offers.
To create a new Event for an Advertiser, complete the following steps:
Note: A default Conversion/Install/Lead Event will display for the Offer in the scenario where no additional Events are being tracked for that Advertiser.
- Open the Advertiser Card.
- Click on the Events tab.
- Click on the Add button.
- Assign a Name to the Event.
- Select an Event Type, Conversion or Micro Event. (By default the "Conversion/Install" Macro Event will always show as the main conversion for a Site/Offer. This is what the general settings and rules of the Offer will use for the conversion. You can change the "Default Conversion/Install" Macro by creating additional Macro Events and selecting "Default" on the newly created Macro. Only Macros can be selected as a default option. Micro Events are not an option for a "Default Conversion/Install" setting.)
- Select the Price Format, Cost Per Event (CPE) or Revshare.
- The Active checkbox is selected by default and allows this Event to be applied to this Advertiser's Offers.
- If the Allow Duplicate setting is enabled, CAKE will track the same Event for a user each time the Event pixel is received.
- Enabling Ignore Duplicate Transaction IDs will appear when an Event is selected to be edited, which will ignore Event pixel fires that contain a Transaction ID value that has already been captured for a previous Event or Conversion.
- If your Received amount will be a percentage of a dynamic price passed in the Event pixel, enable the Received Percentage setting.
- Input your Received amount (revenue) per tracked Event into this field.
- Assign the default Payout to the Affiliate for the tracked Event.
- Enabling Active for All Offers will make this Event active on all of the Advertiser's Offers and Campaigns.
- If you would like to fire a Global System Pixelwhen this Event is tracked, please enable the Fire Global Pixel setting.
- Postback URL - If you are using a Postback URL to call simultaneously with the conversion pixel conversions
- Postback Delay (ms) - This allows you to select a delay period (in ms). This will allow your Global Offer Pixel to fire prior to the Postback URL.
- Pixel - This is where you can place a Global Event Pixel which will be called with every Event pixel.
- When Ecommerce Payout Rules are being used, if the Event Payout/Received Trumps Other Sources setting is enabled, Event payouts will override the Offer's Payout Rules.
- Click on the Create/Save button to create or save your settings.
Once all steps have been completed in the Event creation, an Event ID will be assigned which is visible under the Event details.
Note: Events do not need to occur in a specific order, however, if you wish to order Events for reporting or management purposes, click on the Order Events button.
How to Apply Events to an Offer

Once Events have been created on the Advertiser level, they can be applied to Offers associated to that Advertiser.
To apply or edit Events within an Offer, follow the steps below:
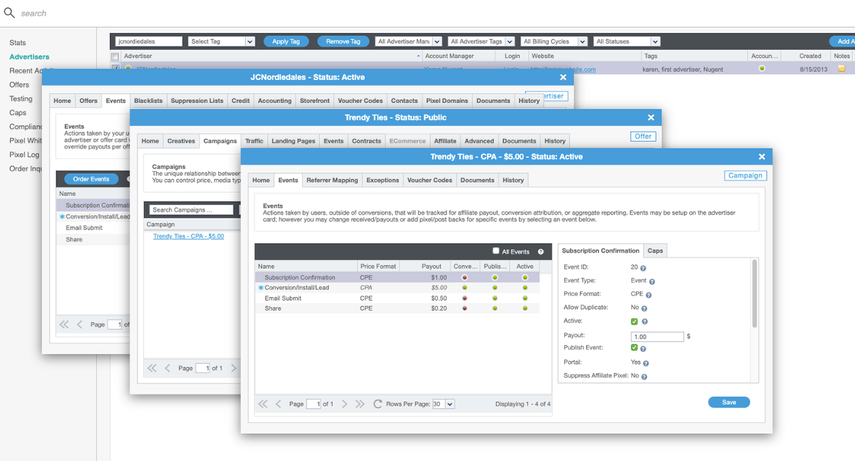
- From the Advertiser card, Click on the Offers tab.
- Click on the Name of the Offer to open the card.
- Click on the Events tab on the Offer Card.
To adjust the status of an Event or the received or payout amount:
- Click on the Event Name.
- Edit the field.
- Click Save.
Publishing/Unpublishing Events
Publishing Events: By default, when creating an Active Event on the Advertiser card, that Event is set to Published on the Offer and Campaign cards. Published status can be overridden at the Offer as well as on the Campaign card.
Publish can be set at the Offer, and Campaign levels. A Published Event will carry these certain characteristics:
- Affiliate Portal = TRUE - The event will show to the Affiliate in the Portal views
- Suppress Affiliate Pixel= FALSE - The Affiliate pixel associated to that Event will fire from CAKE
- Price = any numeric value - The price assigned to that Event will show in the Affiliate Portal
*Note: Since Event payouts are not assigned for Public and Apply to Run Offers in the Affiliate portal, any Event that is Published will be counted towards a "Price Range" shown with the Apply to Run or Public Offer line item in the Offer grid. This is the range between the lowest and highest payout of the published events associated to the Offer and shown to the Affiliate in order to see how much potential earnings they can make.
Unpublish Events (set the Publish box unchecked):
If you would like to track Events that you wish not to show to the Affiliate that you are tracking, you can leverage the Unpublish feature within CAKE. By Unpublishing an Event you are essentially giving the following characteristics to that Event:
- Affiliate Portal = FALSE - Will not show in the Affiliate Portal
- Suppress Affiliate Pixel= TRUE - CAKE will not fire the Affiliate pixel associated to that Event
- Price = will be hard coded and set to $0.00 - CAKE will associate a zero price which will not show in the Affiliate portal

Affiliate Portal "Range"

Configuring Event Caps:
Offer level Event Caps, similar to Click and Conversion Caps, can be configured from the Events tab of the Offer card.
To do so, complete these steps:
- Click on the Event Name.
- Click on the Caps sub-tab.
- Input an Event Cap.
- Select the Event CapInterval: None, Daily, Weekly, Monthly or Custom.
- By default, CAKE will not redirect traffic when an individual Event Cap has been reached as there may be other Events or Conversions that still have allocation. However, you can choose to redirect traffic once an Event Cap is reached by checking the Redirect When Cap is Reached box.
- The Event Cap Behavior setting tells CAKE how to handle Received and Payout amounts when Event pixels are received for users after a Cap has been met. Options include:
- Default to Global (Set in Tracking Settings of Setup)
- Advertiser Payment, Affiliate Payment
- Advertiser Payment, No Affiliate Payment
- Ignore Event Pixel
- No Advertiser Payment, Affiliate Payment
- No Advertiser Payment, No Affiliate Payment
Note: The following Event Cap Alerts can be set in the Alerts sub-tab of the Setup maintab.
- Approaching Offer Event Cap
- Approaching Campaign Event Cap
- Reached Offer Event Cap
- Reached Campaign Event Cap
Customize Events Per Campaign

Events details can be customized per Affiliate's Campaign, such as Status, Payout, Affiliate Pixels and Caps.
To adjust these details, complete the following steps:
- From the Offer card, click on the Campaigns tab.
- Click on the Campaign Name to open the card.
- Click on the Events tab of the Campaign card.
- Click on the Event name.
- Edit the desired field.
- Click Save.
Note: If your Affiliate has a Conversion Pixel placed that he/she would also like to use for tracking Events in another system, check the box for Use Campaign Default Pixel.
Generate Event Pixels

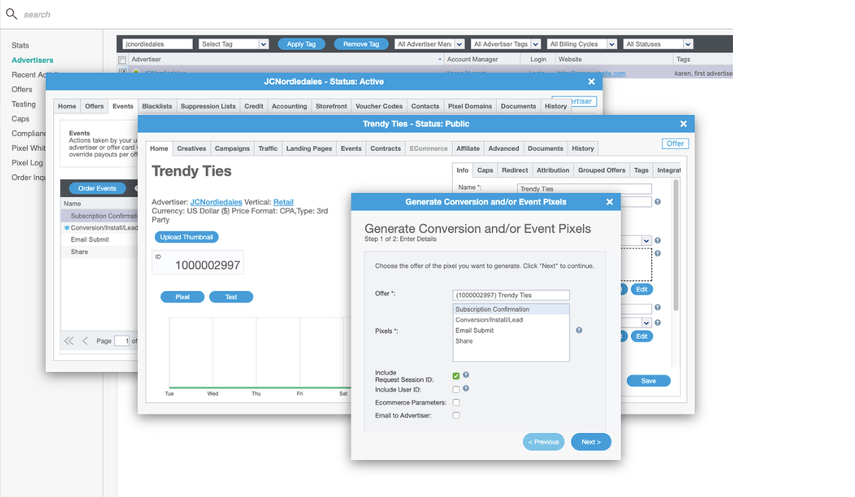
To generate an Event Pixel, follow the steps listed below:
- Open the Offer card.
- Click on the Home tab.
- Click the Pixel button.
- Select the Event on the wizard.
- Click Next.
- Click the Pixel type you wish to use.
- Copy the selected Pixel.
- Click Finish.
Note: From the first page of the wizard, there are additional fields that are not required:
- Include Request Session ID: Selecting this will append "r=REQUEST_SESSION_ID" to all HTML Pixels, whereas by default, that parameter would only be included on the Postback URL. This solution is recommended when there is a concern about users having cookies disabled on their browser. Without a valid cookie, CAKE can convert the user based off of the Request ID value, similar to Server-to-Server tracking.
- Ecommerce Parameters: If the Ecommerce license is enabled within your instance, this option is displayed. Enabling this checkbox will append all CAKE Ecommerce parameters to the generated Event pixels.
- Email to Advertiser: If this box is selected, an email containing the generated Event pixels is sent to the Advertiser's contact(s) email address after selecting Finish on the last step of the wizard.
View Events Reporting

Events are visible in most Reports by adding Columns, Filters and Drill-downs within the Edit View wizard. One example is the Advertiser Master Report found under the Reports main tab or the Stats sub-tab of the Advertiser main tab.
From these Reports, the following options can be added to your View:
- Event Name Filter
- Event Type Filter
- Event Campaign Drill-down
- Event Daily Drill-down
- Events Column
When the Events column is added to a Report, the number of tracked Events will show a hyperlink that opens a break-out Event Conversion Report. From this report, you can open the individual Event card to see details such as the Consumer's History, Payout to the Affiliate and Pixel details.

