This article will cover reviewing all aspects of the Affiliate Card including the following:
- Affiliate Card > Home Tab and SubTab Navigation
- Affiliate Card > Traffic Types
- Affiliate Card > Blacklists
- Affiliate Card > Campaigns
- Affiliate Card > SubAffiliates
- Affiliate Card > Contacts
- Affiliate Card > Documents
- Affiliate Card > Invoices
- Affiliate Card > Referrals
- Affiliate Card > History
Section 1: Affiliate Card > Home > Info

The Affiliate Card is where you can manage all aspects related to a particular Affiliate.
Name: The Name of the affiliate. This can be changed at any time.
Status: Only active affiliates can generate traffic to an Offer. A Pending or Inactive Affiliate's traffic will be redirected via the Redirect Strategy.
Inactive Reason: This is a drop down that contains all Reasons as to why the affiliate is inactive. This is an editable list that can be accessed by clicking on the main Setup tab, clicking on the Reason Lists sub tab and scrolling down to the Affiliate Inactive Reasons widget.
Tier: This drop down will only be accessible if Tiers are activated in Setup. This assigns a specific Tier to the Affiliate. Once a Tier has been set, the Affiliate will only see payouts to Offers that match the Tier selected. If an Offer does not have a Tier that matches the Affiliate will see the default Offer price.
Manager: The Manager drop down will include all employees set up as an Account Manager role
3rd Party Name: A different name or ID assigned to an Affiliate
Address Fields: This will contain the business address for the Affiliate.
Section 2: Affiliate Card > Home > Billing & Payments

Billing Type: This drop down includes Standard or None. If you select None, Bills cannot be generated in the Accounting section for this Affiliate. Typically this is set as Standard if you want to include them in Accounting.
Billing Cycle: By default all Affiliates are assigned to a monthly Billing Cycle. CAKE supports a Monthly, Bi-Monthly or Weekly cycle.default all Affiliates are assigned to a monthly Billing Cycle. CAKE supports a Monthly, Bi-Monthly or Weekly cycle.
Roll Over Negative Bills: Set to "Default to Global" upon creation. There are two additional options: Roll Over Negative Bills or Do Not Roll Over Negative Bills. If you have Negative Bills, when generating the next bill CAKE will ignore or roll over any negative bills into that generated bill.
Tax Class: A text field intended for the Affiliate’s Tax Class.
SSN / Tax ID: A text field intended for the Affiliate’s SSN or Tax ID.
Pay VAT: Informational. Will show in the Accounting export.
VAT Percentage: % of the bill to be added to the Affiliate's bill as a line item.SWIFT / IBAN: A text field intended for the SWIFT or IBAN.
Currency: If you have multiple currencies enabled in your system you can choose the currency the particular Affiliate would like to be paid in. See more about Currency here.
Payment Setting: This drop down will include 3 options for currency options to pay your Affiliate. Pay affiliate in system default currency, Pay affiliate in offer's currency, Pay affiliate in affiliate's currency.
Payment To: This drop down includes either Main Contact (original contact added to the Affiliate Card) or Company Name. The Payment To field is included in the Accounting export.
Payment Type: This drop down includes the payment methods that an Affiliate can be assigned to for billing purposes. This includes Check, Wire, ACH, PayPal, Credit Card and Payoneer.
Section 3: Affiliate Card > Home > Billing & Payments (scrolled)

Payment Type Information: This is a text field that is intended to put information regarding payment to the Affiliate. This information is also accessible in the export of an Affiliate’s bill in Accounting. This field is limited to 200 characters.
Request Payment*: Set to "Default to Global" upon Affiliate creation. This setting allows you to display a "Request Payment" button in the Affiliate Portal when a bill is available. Consisting of an interval, display day and duration, these settings allow you to set how often, when and for how many days the "Request Payment" button is available for the eligible Affiliate Bills (ie: if "Monthly" and day "1" of each month for "3" days is et, the payment button for each affiliate will display on the first of every month for 3 days on all eligible generated bills). Please note that this setting overrides the current global setting.
Min. Payment Threshold: The amount of money an Affiliate must generate in order to be eligible to show in Accounting to be eligible for payment. This is a numeric value. The Affiliate bill will not show in Accounting until this number has been met.
Auto Payment Fee: The Affiliate’s bill will be reduced automatically by the amount placed in this field. This is a numeric value and a static amount of money to be deducted from the Affiliate's payment amount.
Online Signup: This check box will be checked if the Affiliate had been approved through the online signup form.
Signup IP: CAKE will capture the Affiliate’s IP on the Affiliate Signup form.
Referred By: If referred by another Affiliate, select the Affiliate here.Referral Notes: A text field intended for notes regarding the referral relationship.
Section 4: Affiliate Card > Home > Advanced

Paid: By default, this box is checked. If unchecked, Cake will accept Conversions from the Affiliate but they will be $0.00 paid to the Affiliate.
Review: For LeadGen clients enabling this checkbox will send all leads to the Review Queue. For Tracking, if you have "Pending Conversions" enabled in your instance, enabling this checkbox will set all Conversions to the default Pending disposition.
Review New SubAffs: Enabling this will set all auto-created SubAffiliates to "Review." For LeadGen clients, all Leads generated by this SubAffiliate will be sent to the Review Queue for further qualification.
Auto Approve Campaigns: By default, this setting is disabled. If enabled, this Affiliate would be auto approved on any Offers that are Apply To Run.
Auto Approve Pixels: By default, this setting is disabled. If enabled, pixels placed by an Affiliate in the Affiliate Portal would not show in the Pending Pixels Queue.
Hide Offers: By default, this setting is disabled. If enabled, all Public and Apply To Run Offers will not show to this Affiliate in their Portal. Only Active Offers will show.
Redirect Domain: If you have implemented Redirect Domains in your instance, you can specify which domain is used for all tracking links for an Affiliate by selecting the domain from the drop down.
Encrypt Links: This setting will allow you to set whether this Affiliate's links are encrypted or you can default to the Global setting.
Link Type: This specifies which type of link the Affiliate will use: standard, show lite-click, Show/Force Lite Click (Show the lite-click and auto-check) or default to Campaign/Offer setting.
Section 5: Affiliate Card > Home > Pixels

Global Affiliate pixel: A Global Affiliate Pixel will be placed on the Affiliate Card's "Pixels" tab - this pixel is designed as a generic affiliate pixel to be used in place of individual campaign-specific pixels. It is important to note if there is both a campaign and a global affiliate postback pixel, CAKE will attempt to fire the Campaign postback first, and will only fire the global Affiliate postback if the campaign postback was unsuccessful. If one or both are HTML pixels then both will fire.
Pixel: iframe, javascript or image pixel can be placed here. This is a Global Affiliate pixel.
Postback URL: Server Pixel.
Postback Delay (ms): Delay in milliseconds. If you are going to place another pixel in addition to your Server Pixel, you can also set a delay in MS, so that the conversion pixel would be able to fire before the Postback.
Fire Global System Pixel: Enabled by default. Unchecking this box will deactivate firing the Global System Pixel (set on your Setup>Settings page).
Allowed Conversion Type: Use this feature to select which type of tracked action will result in "piggy backing" this Affiliate's global pixel. The default is both - or you can specify Conversions Only or Events Only. Changing this feature will limit the number of requests this pixel will receive based on the traffic being generated by the Affiliate.
Section 6: Affiliate Card > Home > Tags

Affiliate Tags are similar to Offer Tags in the sense that they allow for custom groups to be built for the purpose of accomplishing a task, such as sending an email, viewing a report or editing multiple campaigns.
You can add a new or apply an existing tag by clicking the Add button. Please see the Affiliates - Tags document for more detailed uses of tags.
Section 7: Affiliate Card > Campaigns

The Campaigns Tab on the Affiliate card shows a list of all of the Campaigns for this Particular Affilate (remember that the Campaign is the 1 to 1 relationship between the Offer and the Affiliate).
The Campaign list includes:
Campaign Name
Original: If the campaign is an original or non-original campaign
Type: Media Type that is primarily driving traffic (assigned when the Campaign is created)
Paid: If the traffic is being Paid or not
Review: If Review is enabled (green) it has two meanings depending on which type of offer or side of the CAKE instance you are using. For the LeadGen side: leads will go directly into the Review Queue. For the Tracking side: Conversions will be in the default Pending state when created in your CAKE instance.
Created Date: Date the Campaign was created.
Status: Active, Inactive and Pending
Delete Button: You can delete a campaign by pressing the red stop button
You can also add a Campaign by clicking the Add Campaign button and walking through the Add Campaign wizard.
Section 8: Affiliate Card > SubAffiliates

The SubAffiliates tab contains a list of all Sub IDs passed through on the s1 parameter of the Affiliate’s Unique Link or any Sub IDs manually made.
ID: This is the subID name or value passed in the s1 parameter or manually created
Date Added: Date the first time the SubAffiliate value or name came through on this Affiliate's unique tracking link in the s1 parameter.
Paid: When green, the Paid column indicates this SubAffiliate is being paid for traffic generated (Not supported for CPC Offers).
Review: When enabled and showing green, all traffic from this SubAffiliate is send to either the Review Queue on the LeadGen side or on the Tracking side
Inactive: When enabled and showing green, the SubAffiliate is inactive and traffic...
You can manually add a SubAffiliate by clicking the Add SubAffiliate button.
You can also export all SubAffiliate IDs by clicking the Export.
Section 9: Affiliate Card > Traffic > Traffic Types

Traffic Types: Offer-specific parameters associated to an Affiliate that can optionally restrict which Offers are available to them in the Affiliate Portal.
By default, unless otherwise selected in the New Affiliate Wizard, all Traffic Types are Allowed.
- Price Format: An Affiliate can be associated to 1, many or all Price Formats.
- Media Types: An Affiliate can be associated to 1, many or all Media Types.
- Vertical Categories: An Affiliate can be associated with 1, many or all Vertical Categories.
- Countries: An Affiliate can be associated with 1, many or all Countries.
By default, the Traffic Types settings is informational ONLY.
The Traffic Types can effect which Offers are displayed to the Affiliate. To enable this setting: Go to your Setup> Settings> Affiliate Portal Settings> check the "Filter Offers by Allowed Traffic Types" box and click Save.
Section 10: Affiliate Card > Traffic > Blacklists
When you want to block a source of traffic, you can use the Blacklist tab. This allows you to select an Advertiser & Offer or SubAffiliate, and send that traffic to one of three places: 1) 404 page, 2) Global Redirect and 3) Offer Redirect. It also allows you to set the effective date for the blacklist redirect to a future date.
Offer: Optional - Choose the specific offer it pertains to
SubAffiliate: Optional - Select SubAffiliate IDs if applicable
Reason: The reason this blacklist is being created. These list options are managed from your Setup > Reasons Lists > Blacklist Reasons
Type: Where you want the traffic to be redirected to: 404, Global Redirect, Offer Redirect
Blacklist Date: The date the blacklist is active
The Blacklist tab on the Offer card also ties to the Blacklist tab on the Advertiser card. So if an Affiliate has been blacklisted from that Advertiser, you'll also see that reflected on the Offer card, but greyed out as it can only be edited from the Advertiser card.
Section 11: Affiliate Card > Referrals

The referral program allows a CAKE network to pay out affiliates based on the revenue or profit of their referred affiliates. You will need to enable this feature in your Setup>Settings before being able to make changes here on the Affiliate card.
On the Referrals tab on the Affiliate card, you can customise the payout and terms of the referral program.
Please read our Referral Document to learn more: Referral Program
Section 12: Affiliate Card > Accounting

The Accounting Tab will show an itemized list of all bills generated in the Accounting Main tab.
Billing Period: The time frame of the billing period
Roll Over Ignored will show "Rollover" if there is an amount to add to the next bill generated,
Bill Amount: Total bill amount for the Invoice in the billing period.
Invoice Received: The date the Invoice was received.
Payment Sent: The date payment was sent .
Payment Type: Form of Payment used to pay the affiliate.
--------Generate Individual Bills: by clicking this button, you can create a bill for the Affiliate so that it will show in the Accounting section...
Section 13: Affiliate Card > Contacts
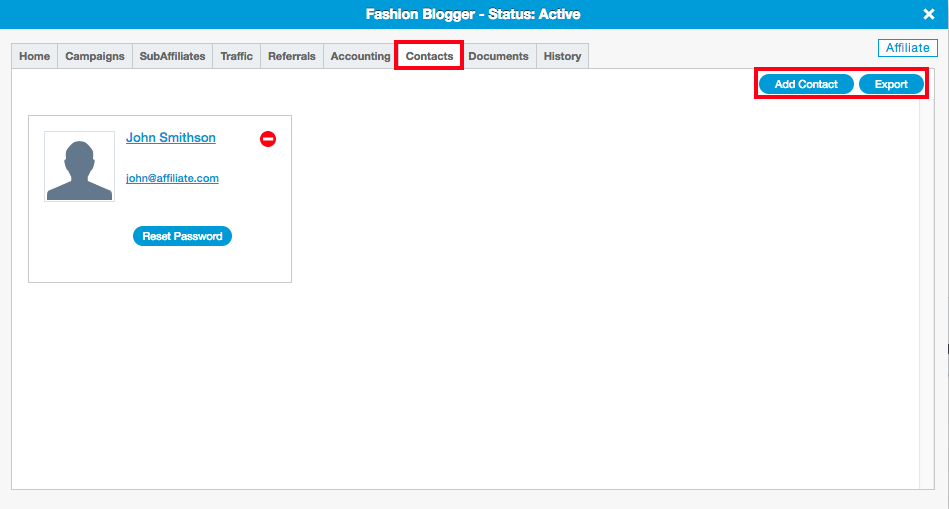
The Contacts Tab contains all of the contacts for this particular Affiliate. You can add additional contacts by clicking on the Add Contact button and walking through the wizard. You can also export all Contacts by clicking the Export button.
Section 14: Affiliate Card > Documents

The Documents tab area contains any documentation you would like to house with the Affiliate information. Simply click the Upload Document(s) button to upload any documents. You will have the option to show this document in the Affiliate portal.
File: Document file name
Type: Choose Type of Document when uploading in the wizard from a list containing: I.O., T and C's, W9/W8, Credit Reference, Posting Documents, Creative Specs., Other, Invoicing
Portal: When green, this document is accessible to the Affiliate through the Affiliate Portal
Date Added: Date that the document was added to your CAKE instance
Actions: Delete by clicking red delete button
Section 15: Affiliate Card > History
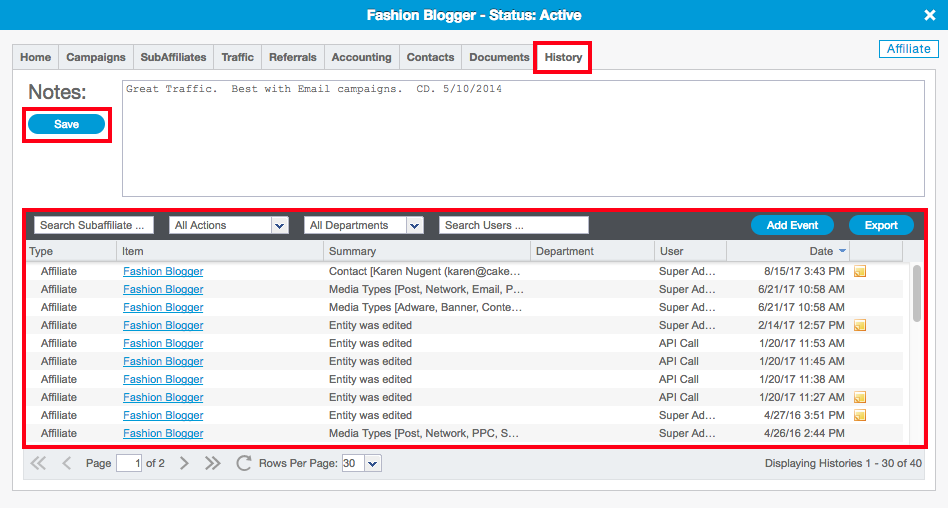
The History tab contains the Notes section and also a running history of changes to the Affiliate card.
Export: You can export the History log into a csv document.