Offer Card > Home Subtabs
This article will cover the following:
- Home > Info tab
- Home > Caps tab
- Home > Redirect tab
- Home > Attribution tab
- Home > Tags
- Home > Grouped Offers
Home Tab Items
1) This is the name of your Offer that can be changed in the Name Field within the Info tab
2) The Offer card allows you to "breadcrumb" to other main entities in the system. Clicking on the hyperlinks will open up the respective cards for the Vertical or Advertiser. This section will also show you the optional currency for the Offer, the Price Format and the type of Offer.
3) The Upload Thumbnail feature allows you to display an image that represents your Offer. This will be displayed in the Offer card within the Admin Portal and the Affiliate Portal. This will also link out to the Preview Link if you have one set. Ideal size for this image is 300x200 pixels.
4) This is the Offer ID that can be referenced in various areas of the platform, such as search.
5) Click the Pixel button to generate a Conversion Pixel or Event Pixel.
6) Click the Test button to launch a new browser window that will give you an opportunity to test the Offer by clicking on your test link, completing the conversion flow, and then returning to the test page to verify the conversion.
7) CAKE has an optional feature called Grouped Offers. When enabled, the Offer card will display a "Generate 1:Many Link" that will allow you to link several Offers together for attribution purposes.
Info Tab

Name: This is the name of the offer. it will be visible to Affiliates in the Affiliate Portal
Third Party Name: This is an optional field that will not show by default. This can be an ID or value associated to an offer. This value can be assigned if you are working with a third party system where the offer name is different. This value will be returned through the offer API request.
Storefront: (must have eCommerce license):
Vertical: The Vertical can be changed at any time. Changing the Vertical for an Offer could alter the redirect strategy that you have setup since a Redirect Offer can be set within each Vertical.
Landing Page: This is the link provided by the Advertiser. Most Advertisers want to be passed Affiliate ID, Sub IDs and other values dynamically. Refer to CAKE’s token list for potential tokens to be used in the Offer Link. Hover over Settings and click on Show Tokens to view this list.
Redirect Parameters: Use this input to enter parameters with CAKE tokens that you want to append to your Offer Link when CAKE redirects. The most common use of this feature is deep linking where networks/advertisers want to ensure that certain parameters are sent to the destination landing page. This field supports all CAKE tokens compatible with the Offer Link. This field will also URL Encode Redirect Parameters. Please see examples below for how CAKE handles parameters and token replacement.
Confirmation Page Link: This is the location where users will be sent post Conversion. Users who click on the same tracking link within the defined Click Cookie Days will be redirected to the Thank You Link, if an Upsell Offer is not defined.
SSL: Enabling this feature will generate a secure conversion pixel for this Offer, force the Affiliate to place a secure pixel on the Campaign, and will force the consumer to redirect through a secure CAKE tracking link.
Received: This is where you can update the revenue for the Offer. Updates will happen in real time.
Default Payout: This is where you can update the default payout for the Offer, which will change the displayed price in the Affiliate Portal. Changing the value in this field will NOT affect Active Campaigns.
Status: The status of an Offer can be changed at any time. Changing an Offer from Private, Apply To Run or Public to Private, Apply To Run or Public will not affect an Affiliate that already has an Active Campaign. Changing an Offer to Inactive will prohibit an Affiliate that had an Active Campaign from opening the Offer Card and will redirect any traffic to the Offer Redirect, Vertical Redirect or the Global Redirect depending on the settings in place. Inactive offers will not be viewable in the Affiliate portal unless they already have traffic run to them.
Hidden: Changing an Offer to Hidden will accomplish the following:
- Affiliates with Active Campaigns will no longer be able to access the Offer Card.
- Affiliates with Active Campaigns can still drive traffic to the Offer normally.
- Affiliates that do not have Active Campaigns will no longer see the Offer assuming the Status of the Offer is Public or Apply To Run.
Redirect Parameter Examples
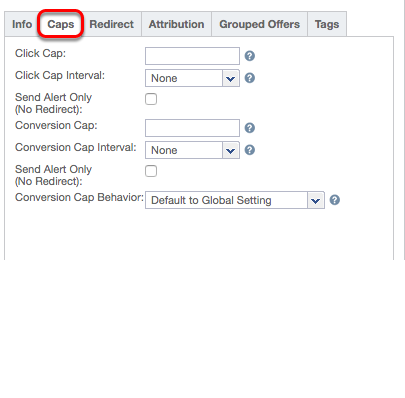
Caps tab

Click Cap: The Click Cap defines how many clicks this Offer can receive before redirecting to the Campaign Redirect, Offer Redirect, Vertical Redirect or Global Redirect depending on settings in place.For example, placing “1,000” will restrict the Offer to only receiving 1,000 clicks for the defined period of time.
Click Cap Interval: This defines the time period for the Click Cap set. For example, if “Daily” is selected this Offer can receive 1,000 Clicks within 1 day and will reset the next day at midnight.Custom allows for a unique date range to be defined.
* If a cap interval has not been selected from the drop down, the offer &/or campaign will continue to accept traffic until that cap has been met.
Send Alert Only: When checked, this will not redirect users once the Click Cap has been reached. It will only send an Alert if an Alert has been created.
Conversion Cap: The Conversion Cap defines how many Paid Conversions this Offer can receive before redirecting to the Campaign Redirect, Offer Redirect, Vertical Redirect or Global Redirect depending on settings in place. For example, placing “500” will restrict the Offer to only receiving 500 Paid Conversions for the defined period of time.
Conversion Cap Interval: This defines the time period for the Conversion Cap set. For example, if “Daily” is selected this Offer can receive 500 Conversions within 1 day and will reset the next day at midnight. Custom allows for a unique date range to be defined.
* If a cap interval has not been selected from the drop down, the offer &/or campaign will continue to accept traffic until that cap has been met.
Send Alert Only: When checked, this will not redirect users once the Conversion Cap has been reached. It will only send an Alert if an Alert has been created.
Conversion Cap Behavior: Determines what CAKE should do for conversions that come in after the Cap has been reached because the user clicked on the Offer before the cap had been reached. There are six options:
- Default to Global: Use the setting selected under Setup.
- Advertiser Payment, Affiliate Payment: Charge the advertiser for the conversion & pay the affiliate for the conversion.
- Advertiser Payment, No Affiliate Payment: Charge the advertiser for the conversion & don't pay the affiliate for the conversion.
- Ignore Conversion: completely ignore any conversion that comes in after the Cap is hit.
- No Advertiser Payment, Affiliate Payment: Don't charge the advertiser for the conversion & pay the affiliate for the conversion.
- No Advertiser Payment, No Affiliate Payment: Don't charge the advertiser for the conversion & don't pay the affiliate for the conversion.
Redirect

Conversion Behavior On Redirect: On occasion, a consumer can click on a tracking link under normal circumstances. Then, post click, but before the Conversion happens, a change could occur in the system. This change could be an Affiliate being set to Inactive, or an IP Address being restricted. In these unique situations, this setting allows you to choose how to handle payment and tracking for the conversion.
Expiration Date: The Expiration date is chosen by selecting a date from the calendar and a specific time from the drop down. Once the Offer has expired, users will be redirected to the Offer Redirect, Vertical Redirect or Global Redirect depending on settings in place. Expired offers will not be viewable in the Affiliate Portal, unless traffic has already been run to it.
Redirect Offer: This is a drop down containing every Offer that can be selected as the Redirect Offer. In an Offer Redirect situation, users will be redirected to the Offer of choice. If no Offer is chosen, users will be redirected to the Vertical Redirect.
Redirect 404: Checking this box will redirect users directly to a 404 page as opposed to an Offer chosen from the Redirect Offer drop down.
Redirect Domain:This allows you to select a Redirect Domain that will be applied as the tracking link for all Campaigns, unless a redirect domain is specified for the Affiliate directly. This is an optional feature that will appear once redirect domains have been applied to your system.
Conversions From Whitelist Only:If you added Pixel Whitelists, enabling this feature will restrict this Offer to only conversions that have occurred from the IP's that have been whitelisted.
Track Search Terms From Non-Supported Search Engines:CAKE is tracking the search terms that a consumer may have used prior to clicking on the CAKE tracking link. By default, CAKE is receiving search terms from the major search engines such as Google, Yahoo!, etc. Enabling this feature will include additional search engines that may return additional values.
Attribution

Credit Model: Select the Attribution model for this offer. The rules set in the Attribution model in Setup >Attribution Settings will define how credit is assigned to touchpoints.
Payment Model: First Touch or Last Touch: Select how you would like to handle Attribution for your traffic. First touch will give credit to the first Affiliate that generated the conversion. Last Touch will give credit for the conversion to the last Affiliate that generated the lead.
Click Cookie Days
Impression Cookie Days
Minimum Time to Conversion: When the minimum time to conversion is not met, on redirect setting will determine how the conversion is handled. Conversion Behavior On Redirect can be changed at the Offer or Global Setting level.
Auto Disposition: The amount of time, in hours, before a pending conversion is automatically moved to an accepted/rejected disposition (based on configuration)
Conversions from Whitelist only: When checked, this will block all conversions that are not included in the whitelist (Advertisers > Pixel Whitelist), so it is not recommended where you have HTML type pixels placed with this Offer/Advertiser.
Conversion Invalidation Threshold: Enter a value between 0-100 to indicate the threshold for conversion invalidation. Invalid conversions will follow the Conversion behavior on Redirect
Click Scoring: For this Offer, select whether Click Scoring is enabled or disabled. Selecting "Default to Global" will utilize the configuration established on Setup > Settings > Third Party Integration Settings > Enable Click Scoring.
Voucher Code Attribution: Only Available to Ecommerce Licenses
Attribution (continued)

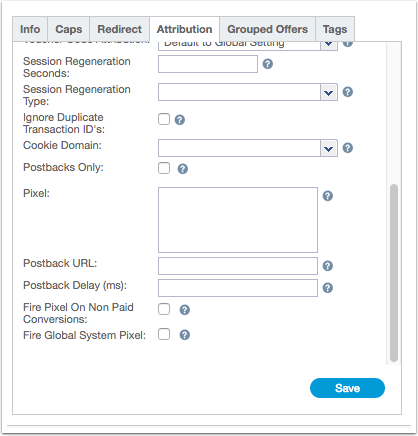
Session Regeneration Seconds:This sets the window of opportunity for a consumer to convert once they have clicked on a CAKE tracking link. For the most part, you will use this feature with mobile app tracking as the tracking mechanisms are slightly different than desktop or mobile browser tracking.
Session Regeneration Type: Some tracking situations require a unique setup, such as tracking an app install. In these situations, traditional cookie tracking or tracking via the Request Session ID is not possible. Instead, CAKE provides an alternative method that allows you to track a conversion via a unique ID passed on the tracking link, or mobile device information. This drop down includes the type of tracking method you wish to use. Selecting s2, for example, will set the Offer up to track conversions based upon a unique ID passed in s2 and then returned on the Postback URL.
Ignore Duplicate Transaction IDs.: With this feature enabled, CAKE will only allow conversions to occur with unique Transaction ID values, within the Cookie Day duration.
Cookie Domain:These are independent domains used for specific Offers or Campaigns. These must be added by CAKE Support. If added, you can select your Alternate Cookie Domain in the drop down.
Postback Only: Restrict Global offer pixels to server to server format only
Pixel:This is where you can place your Global Offer Pixel which will be called with every conversion pixel.
Postback URL:If you are using a Postback URL to call simultaneously with the conversion pixel conversions
Postback Delay (ms): This allows you to select a delay period (in ms). This will allow your Global Offer Pixel to fire prior to the Postback URL.
Fire Pixel on Non Paid Conversions:If checked, CAKE will fire the Global Offer Pixel anytime a conversion occurs, regardless of whether you pay the Affiliate on that conversion.
Fire Global Pixel: If checked (and the "Fire Global Pixel By Default" is checked in SETTINGS), CAKE will fire the Global Pixel placed in your system settings in addition to the Global Offer Pixel if placed. If this is not checked, the Global Pixel will not fire.
Grouped Offers

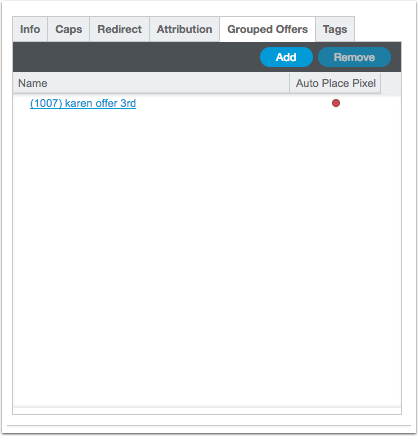
Grouped Offers allow you to accept Affiliate traffic to a "Parent Offer", and then allow the consumer to redirect through to the "Child Offer". Often times, a parent offer can be a landing page that promotes several different children offers.
The Grouped Offers tab will be hidden by default unless you've enabled the grouped offers feature in Settings.
Once enabled you'll be able to add or remove offers from here. Select the 'Auto Place Pixel'option if you want CAKE to copy the affiliate's campaign pixel into the child offer.
Tags

Tags are custom keywords that can be applied to an Offer. Offers can have one or multiple Tags.
Tags allow you to group multiple Offers together that share a common tag for the purpose of viewing custom reports, editing multiple Offers, or displaying unique search terms in the Affiliate Portal.
The Tags Tab allows you to see all the tags associated with the offer, and whether they're visible or not to affiliate's via the red or green dot under the Portal Column.
To add a new Tag, simply click Add and either choose an existing Tag or type in a new Tag and click Save.

